Warung Bebas

Selasa, 28 Juni 2011

Senin, 27 Juni 2011

DESUCON 2011

Hiyaaaaaa, Desucon is overr!
I had a.... decent con! I think!

At first everything was kinda really boring, and actually that's how everything ended too. But somewhere in the middle I had time to chat with my friends, photoshoot, eat pizza and maybe have a laugh!

Saturday I was cosplaying Grell from Kuroshitsuji, and it was otherwise okay - I think the cosplay came out okay, but the wig! THAT WIG! It was so heavy and long that it kept sliding back, and that caused me an sore neck and a headache! T^T And it was annoying as hell!

Sunday I was cosplaying Mello from Death Note, and that was friggin' awesome!!!
The scar was awesome, even if made in a hurry, and it wasn't as painful to wear as last year. I didn't cry at all and people seemed to like my cosplay, it's just an sad fact that Death Note is no longer fashionable to cosplay, and that's why I didn't get much DN friends :U

Over all I didn't buy anything else but food and few buss tickets. I kinda didn't have any money, but I also didn't find things to buy... I usually don't!

Had a quick run at the Aniki Photography Service at some point and Sunday pictures are here, but Saturday pictures still missing... Let's hope they show up soon~!!

PICTURES: 

Morning 6:30am, got my Grell cosplay on!

Desucon had really nice dressing rooms! Enjoyed.
w/ Hilppa (Undertaker) and BIRTHDAYBOY (Red)

(c) Miika Ojamo, Aniki Photography Service.

Kamis, 23 Juni 2011

Claudia Auditore

I'm pretty much basically finished with Claudia, enough to take as test run, there's a few details I need to fix up a bit but I thought I'd show you all the test run I did. So I thought I could break it down a bit more then I did in my previous post where I spoke more about the progress.

I wanted to cosplay Claudia after I saw her in Brotherhood, she was fine in AC2 but she became SO much better in Brotherhood. I was a bit anxious to start on that dress that she wears, I really never made anything like that before. But then I saw her new outfit near the end of the game...and fell in love. She got really bad ass and started fighting alongside her brother at the end sequence. I think I loved her character as soon as she stabbed those guards early one and took on a brothel herself just to help the brotherhood.

What was interesting about this outfit is how it was based off of Maria Thorpe's outfit from Bloodlines and the end of AC2.
Photobucket


Pretty interesting, just a few minor changes, obviously the color, choice of fabrics and the boots are pretty different. But overall the design is still the same and references her outfit.

The first part was her tunic. The tunic was based off of dress pattern I had laying around, the same dress pattern I used for Trucy. The pattern had to be modified a bit, because the top part was separate from the bottom, but it had the same panels I needed for her tunic. The panels go between a brocade and a satin. And in between there's bias made from the satin.

The front was probably supposed to come together with hooks or latches, but I went with ease for myself, not entierly period accurate but I'm wearing a cape so that little detail wouldn't be noticed. I added a zipper in the back and the front is sewn together with a ladder stitch, to give it that look that her tunic had. The inside is lined with a super light lining material. It's pretty near sheer, but the point was to keep the brocade from fraying. The brocade frays SO easily, I sort of wish I had fray check to keep it from being so annoying. I did end up using a zigzag stitch on my machine to help it, but it goes to show that a serger would really help. But you make do with what you have! And a zigzag stitch is a decent substitute if you can't afford a serger.

The shirt part was based of a blouse pattern I had laying around, but it's not a full blouse. I made it enough to where it met the tunic and then sewed them together. I mostly did it to avoid the amount of layers I had to wear, because I knew how hot I'd be in the costume. There's still the cape I had to wear.

The cape itself was drafted from my own patterns. I had a hood pattern laying around that I modified and used, the caplet parts were part drafted on my own and the rest I found something I could modify. I lucked out and had JUST enough fabric to make the actual cape part and line it. That wasn't too difficult, the difficult part was to use the bias around the caplets.

Bias itself is never too bad, it's the corners that can get you. I had never sew corners before.I found this amazing tutorial online on how to do it, and it really helped out a lot. What is missing and what I still haven't done is the design she has painted on the back of her cape. I still really need to get around to doing that.

The rest are bought. I was able to use my own hair for her since she just has it pulled back. The boots, bracers and belt are all bought and thanks to a friend I had a small knife to carry!

Finished
Photobucket

Photobucket

Photobucket
Also thanks to this Ezio for posing with me! He was fantastic.

With the finished photos from the test run I really need to fix up a few minor details. But overall I'm pretty happy with how it turned out and I'm even more excited to wear it to Otakon!

Tutoriales Disney

Porque no de Japón se vive solamente, cosplay podemos hacer muchos! y de mil maneras, formas y personajes! esta vez os dejamos cuatro vídeo-tutoriales sobre maquillajes Disney, disfrutad de ellos!

Mulán


Blanca Nieves


Jasmine


Hacerte un vestido de Lolita

A veces si buscamos en revistas japonesas podemos encontrar algunos tutoriales curioso, hoy os voy a dejar uno que viene en una famosa revista llamada Kera.

Para verlos mas grandes tenéis que clickar en las imágenes:


Realmente, con ayuda de un maniquí es muy muy fácil hacer este tipo de cosas, en caso de no tener uno, siempre os podéis hacer el vuestro propio haciendo un molde de vuestro cuerpo con yeso.

Rabu, 22 Juni 2011

Cosplay Tutorial: Lady au Pair

Illustration by Chandra Free

Yes, my Dragon*Con is going to be Venture-tastic, this year. Is anyone complaining? I didn’t think so.

Where the Dr Girlfriend costume draws on a 1960s, Jackie O. motif, Lady au Pair is more like a badass French nanny. This means lace and daisies, plus more purple than you shake a shrink ray at. The costume breaks down into three basic parts: lacy purple dress, matching hat with daisies, and white stockings and black boots.

Dress
Things you’ll need:
-3-4 yards of purple fabric. Something lightweight is probably best.
-3-4 yards of white lace.

I used Butterick pattern 6631, a Regency dress pattern that seems to be out of print, though you can still find it for sale. It worked out well, in the end, but, unless you’re good at improvisation, I’d recommend finding something else.

For the most part, I just followed the pattern as-is, using a light-weight purple fabric (that is actually identical to what I used for my Dr. Girlfriend costume). Obviously, the skirt needs to be cut shorter than the pattern calls for, and you should measure from just below your bus line to wherever you want the skirt to fall.

The two things that gave me some trouble were the sleeves and the back. The sleeves are gathered, which is inherently a pain in the ass, and the pattern requires that you also make lining for the sleeves because they are impossible to hem. Something you should know about me is that I never line anything unless I absolutely have to, mostly because I am lazy and don’t care, and there was no way I was making those sleeves twice. The good news is that the lace trim around the edges makes hemming the sleeves unnecessary.

The back of the dress was another story.

I stared at that pattern for hours, and I still don’t understand how the back is supposed to work. I wound up just folding in the skirt as needed and folding down the sides of bodice back so that it came to a V shape. Since it wasn’t meant to do that, I had to put in something to hold it up, so I used a piece of pearl chain, sewed into the dress on one in with a hook sewn in at the other. It looks a little funky, up close, but it’s fine at a distance. The whole thing actually looks kind of cool.


The other modification I made was to put an inset in the neckline, because it came down way too far. All you have to do for that is cut two triangles big enough to cover the area you want, stitch the hypotenuses together and fold to create a clean edge for the top, and sew it into the neckline. It’s super easy.

Finally, every edge of the dress gets edged with white lace. You would think this would be the easy part, but this is where I made the most screw-ups. To start with, I used off-white lace, because I thought it would look good with the purple, and realized later that it didn’t match my white stockings. This isn’t a big deal, but I felt really dumb. Then I didn’t buy enough lace... twice. If you’re attempting this costume, take heed: You will need much more lace than you think you do. When all was said and done, I think I wound up using somewhere shy of four yards. I also used a wider lace for the bottom hem for complicated reasons related to my dumbassery, but it looked okay.

I hand stitched the lace, which took about 8 hours, total. Specifically, it took something like 10 or so episodes of Fringe.


Hat
Things you’ll need:
-Medium brimmed straw hat.
-Purple spray paint.
-1/2 yard of black ribbon.
-Silk or plastic gerber daisies.

If you can’t figure this one out, you may be too stupid to costume.

I found an appropriately shaped straw hat for $3 at the Goodwill and spray-painted it purple. If you need to paint, you’ll probably want to get a matte paint, rather than a gloss, because straw hats aren’t supposed to be shiny. I was painting over a light blue and got it covered to my satisfaction in about three coats.

I was only able to find the daisies in a bouquet, not singly, but you’re going to be cutting them, anyway, so it doesn’t really matter. I cut two daisies as close to the flower as possible and cut a third with a 4-5 inch stem. I (carefully) hot-glued the ribbon around the crown of the hat, using straight pins to hold it in place. Once the glue was dry, I glued the two short daisies flat against the ribbon so that they overlapped. I glued the cut end of the long-stemmed daisy under the ribbon on the other side of the crown. I used straight pins to hold all three of the in place. Be sure to use enough glue, especially on the long-stemmed flower, since it’s more likely to come off.


Stockings and Boots
Things you’ll need:
-Cash.

Though it’s nearly impossible to find good reference pictures for Lady au Pair (or good Venture Bros. screencaps period) her boots seem to be standard black combat-style, which works as a fantastic counterpoint to the hyper-feminine look of the dress. You can get comfortable, relatively cheap combat boots online, but you'll have to shop around a bit. To save money, I went in a different direction and used a pair of heeled black ankle boots that I already had.

You can get white stockings just about anywhere that sells underwear or lingerie. I had a pair of lacy white thigh-highs left over from another costume, which work great, and I bought them at The Den of Evil Wal-Mart. You’ll probably want to invest in some kind of garment adhesive, like sock glue or adhesive strips, to help your stockings stay up. Come Dragon*Con, I’ll probably be borrowing Sabine’s body adhesive from Sock Dreams. This kind of stuff is a good investment for any cosplayer and is something you’ll want to carry with you at con.


Hair, Make-up, and Accessories

Hair is less of a concern for Lady au Pair than for Dr. Girlfriend, since it’s mostly covered by the hat, but a few little curls peeking out the bottom won’t be amiss. Make-up is almost identical, though I’m using a purple eyeshadow instead of blue. The only major accessory is a purse, the saga of which I will detail in a later post.

Some Lady au Pair cosplayers include Moppet dolls as part of the costume. I chose not to because, one, it’s a lot of extra work I don’t have time for, and, two, I hate the Moppets. If you want your own super-creepy tiny assassins, however, there are tips for making them out of regular baby dolls here. As far as I can tell, there’s no place to buy actual Moppet dolls or instructions on making them from scratch. If I ever become possessed by an evil demon and attempt such a project, I’ll let you know.


This costume wasn’t quite the feat of engineering that Dr. Girlfriend was, but it had it’s own challenges. In the end, I was really pleased with the results, and I think the dress is one that will work even in a non-cosplay context.


Production time: About one month.
Final Cost: Aprx. $15, not including sunk cost of boots and stockings.

-shadowen

Senin, 20 Juni 2011

Cosplay Tutorial: Dr Girlfriend


Before we go any further, be warned that this is not a costume for the faint of heart. It’s one of the most difficult things I’ve made to date and is, quite frankly, a feat of engineering. If you’re dead set on being Dr. Girlfriend but don’t think you’re up to the challenge, there’s a simpler take on the costume here (no tutorial), and there are a few for sale. I’m not linking to those because we here at Frenemy Cosplay don’t believe in buying pre-made costumes. If you didn’t bleed on it, you don’t deserve to wear it.


Are you scared, yet? Good. Let’s go.

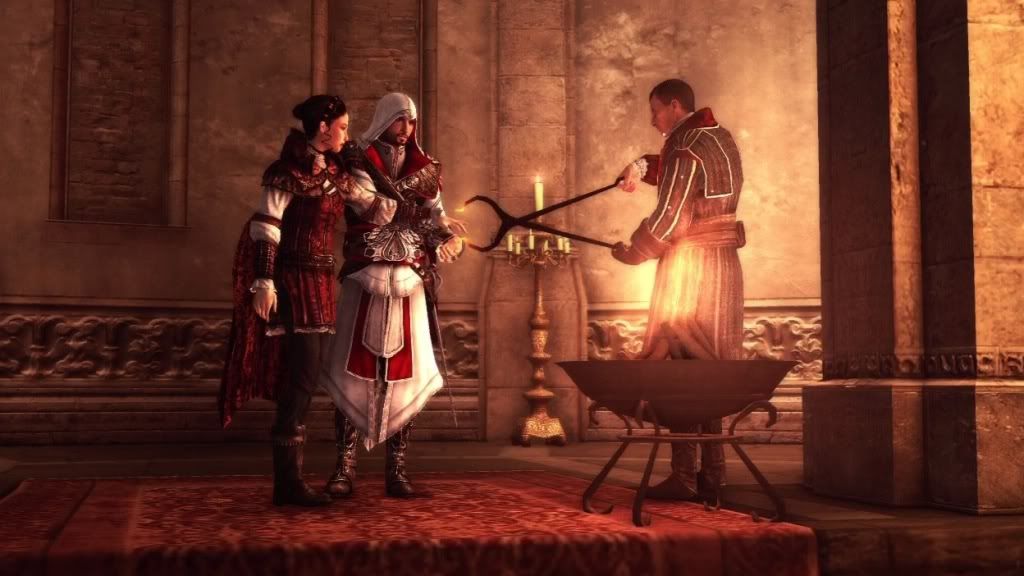
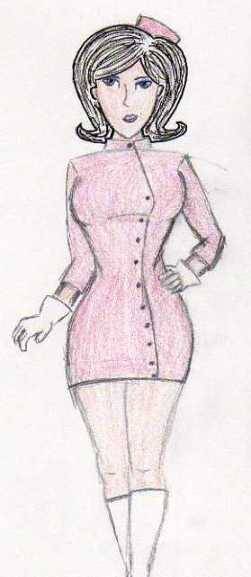
Whatever design you use, the look you’re going for is classic Jackie O. with a super villain twist. This breaks down to a few basic elements: pink dress, pillbox hat, and white gloves and boots.

Pink Dress
Things you’ll need:
- 3-4 yards of pink fabric. Stretchy is good, but not necessary
- One (1) 20” zipper
- buttons

I went for more or less screen accurate, with the dress. I’m not gonna lie, it was a pain in the ass, but I got decent results.

I used Simplicity pattern 5098, which I believe is now out of print, as a base. Patterns can be a pain to deal with, but, frankly, I can’t work without them. For the purposes of this tutorial, I’m assuming a basic understanding of how to use a pattern. If you don’t know how to use a sewing pattern.... Well, we might have to do a post for that.

This is not that post.

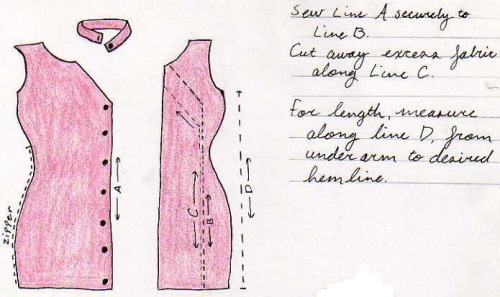
This pattern has a single, big piece for the shirt front, and it tells you to cut one. I cut two, one that follows the diagonal seam across the front and the other stops at what will be the center of the front of the dress. You can see the basic shape of these pieces in this diagram.


To turn the shirt pattern into pieces for a dress, measure the length from your underarm to wherever on your leg you want it to hit, allowing two to three inches for the hem (and the inevitable screw-ups). Be sure to mark your cutting line very carefully, so you don’t wind up with a dress that’s too long on one side.

The bigger of the two front panels will be your top panel. Fold over the diagonal and center (line A, in the diagram) edges and stitch them like you would a hem. Lay this panel flat over the other front panel, using the neckline to make sure they’re centered, and sew line A flat to the smaller panel. Leave the diagonal line open, because, trust me, you’re going to want an open neckline on this dress.

But, shadowen! I hear you say, Dr. Girlfriend’s dress has buttons up the front! Yes, my fellow Venturoos, yes it does. And do you know why the good doctor is able to wear a skin-tight dress with, presumably, working buttons up the length of it? Because she’s a cartoon. In real life, buttons gap, especially on tight or fitted clothes. If you are, in fact, a cartoon, you may disregard this tutorial and make a dress with working buttons. If not, let’s keep going.

Make the back of the dress as the pattern directs, except with the extra length, obviously. Once you have your back and front ready to go, attach the seams normally 
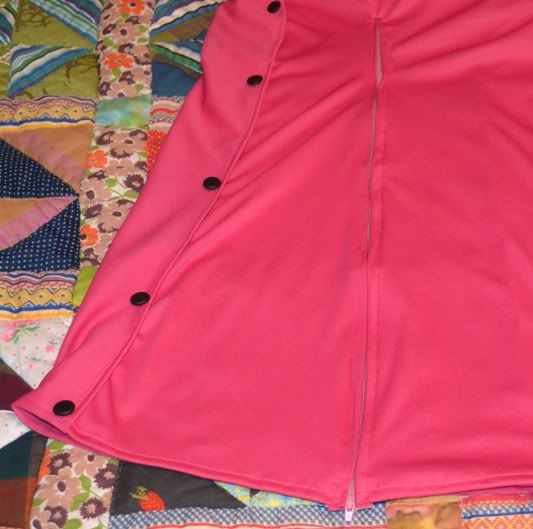
on one side. The zipper goes on the other side. Now, this was my first time putting in a zipper, and I’m not even going to tell you how I did it because I did it wrong. Regardless, I positioned the zipper so that it zips down the side of the dress toward the hem.
The fact is, unless you’re a tiny slip of a thing, you’re going to need some kind of fastener to get into this dress.


For this costume, I cut the pattern a size smaller than I normally wear (I’m a size 16 US; I cut it to a 14), and the dress looks like it’s been shrink-wrapped on. This works fine for the aesthetic, but it necessitates the use of a body shaper, so judge accordingly.

Once you’ve got this done, you’re 75% finished with the entire costume. No, really. That was the bulk of the work, right there. Don’t get too excited, though. There’s still plenty to do.

Cut the piece for the collar a little longer and wider than the pattern directs, but otherwise make the collar how it tells you. Same for the sleeves. Measure from your shoulder to past your elbow and cut your fabric pieces accordingly. Once again, mark your cut lines. You may live to regret it, if you don’t.

For the buttons, I used small, matte black pearl buttons, but you can use whatever you have available or think looks best. Measure increments down the top seam on line A and mark them with a fabric pen or straight pin. This is where your buttons will go, so you can do as few or as many as you choose. The button on the collar is a working button, which is a pain, but necessary. It should fall just left of center on your throat.

Finally, I cut away the excess fabric from the smaller front panel, which isn’t necessary, but gives a slightly cleaner look with the fabric I used. If you do this, be careful not to cut too close to the diagonal (see line C in the diagram), or you’ll wind up with a gaping hole. I learned this the hard way.

If you’ve made it this far, then congratulations! You’ve made the really difficult and really iconic part of your costume!

Now for all the other parts.

Pillbox Hat
Things you’ll need:
- an empty oatmeal can, or similar cardboard container
- 1 sq. foot-ish of excess fabric from the dress
- hot glue gun
- several large paper clips
- embroidery floss
- a needle with a large eye

This hat? Is something I will never make again. For serious.

That being said, it was cheap to make and didn’t take very long. I cut a can of oatmeal about two inches from the bottom to use as a base form. then I cut a circle of fabric about a centimeter wider than the base of the can. Both of these estimations turned out to be a little much, so I would recommend cutting the can about an inch or and inch and a half from the bottom and cutting the circle a little smaller. Cut a strip of fabric about an inch wider than the height of your cylinder and an inch longer than the circumfrence of the circle. Attach the strip of fabric to the circle of fabric so that it creates, more or less, a cylinder with an open seam.

At this point, you’ll want to see how your fabric fits around the base and adjust accordingly, as well as attaching the open edges of the strip. Once you’re moderately satisfied with the fit of the fabric, use a hot glue gun to fix the loose edges to the inside of the base. Since you want the fabric to fit pretty tight, you’ll need something to keep it in firmly in place while the glue dries. Large paper clips will work fine. Don’t worry about gluing down the entire edge, right now. Just fix enough points on the inside so that the fabric will stay in place.

I’d like to take this opportunity, if I may, to make some observations about hot glue guns. Specifically that there is evidence to suggest their secondary purpose may very well be to make smart people feel stupid. These things are fairly simple tools, but do not underestimate the danger they present, else you will find yourself with minor burns and feeling dumb as fuck.

Hot glue guns, friends. They’re no laughing matter.

Once the first round of glue has dried completely, go back with the glue gun and fix the remaining fabric to the inside of the can. Then set it aside and go do something else for a little while.

Is it dry, yet? Okay, good.

Now that the hat itself is made, your primary concern is getting it to stay on your head. You can try using an elastic band or attaching hair combs, but I stitched four small loops of embroidery floss on the inside edge so that I could affix the hat with bobby pins. At least, that was the plan. In the picture, the hat is held on with small hair clips, which is a temporary solution, at best.

What I ultimately did was gather up a small section of hair where I wanted the hat to go, coiled it up with bobby pins, and used a hat pin (read: very long needle) to secure the hat to my hair. It took some trial and error, and I won’t be doing any rigorous dancing in this costume, which would really be a very bad idea, anyway. Still, it holds well enough to make it through the day.

White Gloves and Boots
Things you’ll need:
- ...cash?

For the shoes, you have two options: buy boots or make boot tops. I chose to buy boots - mostly because I... have a thing for boots - but there are plenty of tutorials on making boot covers.
Boot covers with zippers
Non-stretchy and stretchy fabrics
Pull-over boot covers

If you choose to go this route, take a good look at the tutorials before you get started. Boot covers are deceptively simple and surprisingly difficult to make. It’s definitely the cheaper option, just know what you’re getting into.

If you choose to buy boots, the hardest part will be finding some that you’re willing to wear and that fit in your price range. As those of us with shoe obsessions know, good boots are hella expensive. If you want to go for screen accuracy -and can pull it off - look for white, stretch Go Go boots. Your best bet for these will probably be costume shops or online fetish clothing stores.


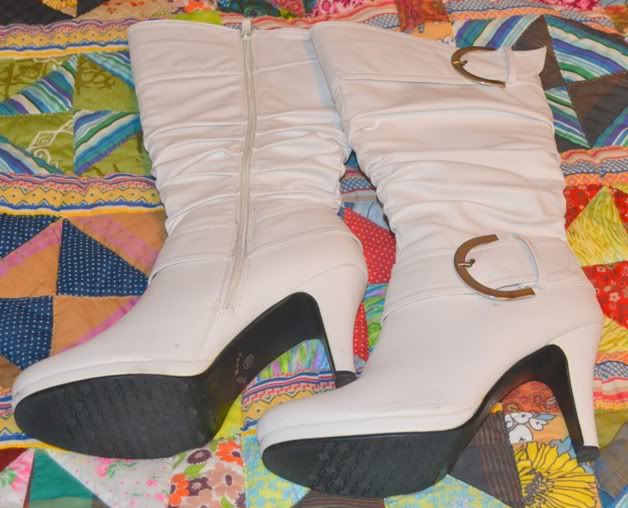
Even if you’re not going for screen accurate, white boots can be difficult to find in stores since, y’know, it’s not 1964. Being a lover of boots, short on cash, and having slightly chubby legs, I decided to fore-go the stretch boots for some that will look good on me and that I can wear when I’m not at con. I found these on Ebay for about $35, including shipping. Boutiques.com and ShoeOcean.com also have some good options.


The other thing to consider with the boots, and with all costume shoes, is the heel. If you’re buying boots, be sure to look at the height of the heel before you click “add to cart”. You don’t want to wind up mincing around on five-inch stilettos if you’re used to wearing sneakers everyday. I wear heels regularly, so the four-inch ones I got won’t be too much trouble, but I’ll definitely be putting a cushion in them before the con.

As for the gloves.... Don’t even try. Just buy the damn gloves. Seriously. You want wrist-length or three-quarter white gloves, and you can get them at Claire’s and places like that for not much money. Even if you hand-make the rest of this costume, buy the gloves.

If, however, you are crazy or a purist, there is a tutorial for making lycra gloves here.


Hair and Make-up
My hair is currently a short, black bob, anyway, so it’s more-or-less the right style. I just divided my hair into sections and used a curling iron to add some height and volume, curling the ends of the bottom layer out to give it that kick. I tried the look later with curlers, and it worked a little better. I’ll probably use hairspray or spray gell on the day of the con to help it keep the curl. If your hair is just nowhere near the right color or style, and you’re not willing to make drastic alterations, a wig might be the way to go. At some point in the future, we’ll be doing a post on choosing and wearing wigs, so keep an eye out.

As far as make-up, the important part is really the eyes. You want a classic cat eye shape with a blue eyeshadow. I used Maybelline’s “Blue Freeze” creme eyeshadow over e.l.f.’s lid primer and Palladio’s black Eye Ink pen for the liner. The lipstick is M-A-C’s “Pink Poodle” lip glass (obviously) over Rimmel’s “East End Snob” creme lip liner.


Other Accessories
The good doctor wears gold button earrings, which went out of style about the same time as pillbox hats. I got a pair of plastic button earrings for 99 cents at Goodwill, roughed them up with a metal nail file, and spray painted them gold. Sandpaper probably would have worked better, but I wasn’t about to go buy a pack of sandpaper for one tiny project. I just happened to have a can of gold spray paint left over from another project, like you do.

I’m planning to use the leftover fabric to make a purse, because, as Sabine pointed out, I need a place to put my shit. That’s going to be its own special production, though, and will get its own post.


Production time: About 2 months total, with breaks.
Final cost: aprx. $50, all included
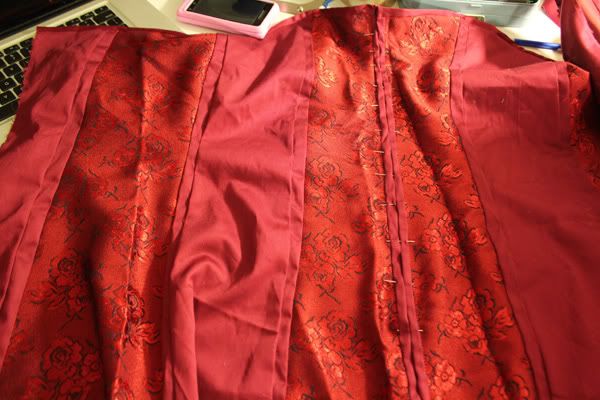
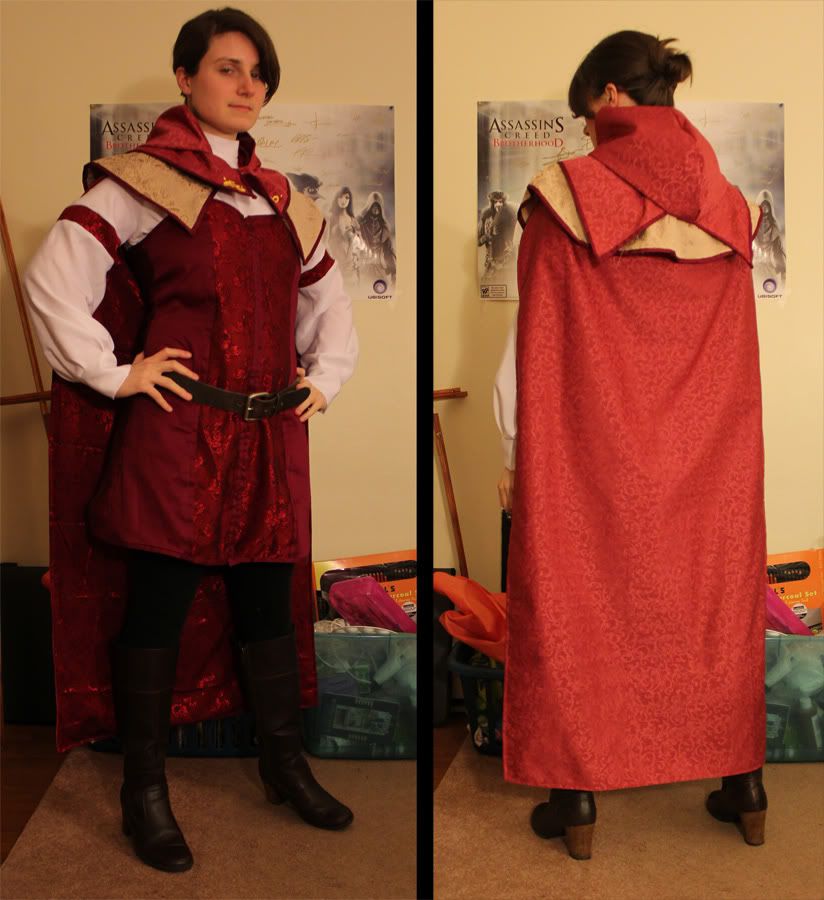
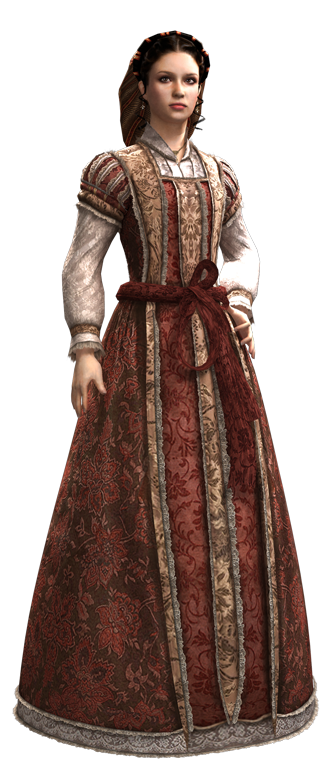
Minggu, 19 Juni 2011

Sabtu, 18 Juni 2011

K-pop dance

Si piensas que recién me entero que existe el kpop estás wrong! Tengo contactos y friends que me mencionan de muchas muchas cosas sobre kpop desde hace años y al inicio no entendía nada, pero poco a poco voy pillando.

Hace poco me he propuesto aprender la coreografía de Miss A "Bad Girl, Good Girl". Pasaron semanas desde que empecé a "entrenar" jaja y hay cierta mejoría pero sigo haciendo los pasos torpes y no sexies xD

Pero mi profe dice que no estoy mal (sólo trata de animarme xD), igual mis pasos son torpes, pero no me rendiré hasta que me salga decente, espero no tardarme mucho :)
Click sobre la img para ver el vid:
Bueno, tengo un Cute And Hot Project entre manos. Es más dificultoso pero tengo fe de que saldrá bien...Tengo fe en ustedes, guys! 

Boyfriend es un nuevo grupo KPOP y mi primi me envió el MV de ellos...Me puse a ver el vid, ni pasaron 30 segundos, sólo dije "Pero qué gays!"
Pero me miré el video nuevamente... Una y otra vez... y me traumé!!! Son lindooos (L)

Y bueno, pasaron días y sigo traumada xD
Click en la img para ver el vid:
Si el cute and hot project avanza succesfully podré morir en paz! *x*

Just Saku

→Photos without cosplay~


→Trip to Ishigaki~

..............................


...................................
Saku and her sister!♥
_________________________


............................


Twitter Delicious Facebook Digg Stumbleupon Favorites More

 
(˘̀^˘́҂)ҧ Design by uncensored8 | By Maling Durjana DMCA_logo-200w Pelacur Gratis Fast loading | Sexy Analytic (˘̀^˘́҂)ҧ