Warung Bebas

Senin, 30 April 2012

Black Gold Saw- Skeletal Claws Progress

What is this?  An update?  Gasp! Shock!  But since I finally have some time on my hands, I was able to mostly finish the claws for BlackGold Saw

So I started by making a few sketches from the  BlackGold Saw figma on which I will be basing my costume.

And then I will pose. Just like this. In front of a wind machine.
I was inordinately excited to be making skeletal looking claws, because I have this strange obsession with bones and pseudo-anatomical correctness, so I spent much time carving and shaping them until they resembled elongated human phalanges.  Oh, and if you haven't figured it out yet, I'm kind of weird.

So I started with Premier stone clay by La Doll, and I found that it is very lightweight but also very sturdy.
I have tried to break my prototype claw, but I have yet to succeed without damaging furniture.
It can be found at pretty much any craft store, and while it is a little pricey, you'll find that the small package actually goes a surprisingly long way.  I managed to make all ten claws plus two prototypes and two "oopsies" when I realized that I needed to flatten out the proximal digit so that it would fit on my finger without being too bulky, and I still have a bit left in the package.

So here are a couple of the claws after they had been carved and let dry for 24 hours.  I think this is a pinky claw and an index finger.

Why hello, Xbox 360, fancy seeing you here
Post paint!

You have no idea how many times I had to retake this picture for it to not come out blurry.  
The claws have been painted with a gradation of red to black.  I'm afraid my camera doesn't really do the colors justice, though.  In order to keep the paint from chipping, I decided to gloss them.  I had bought Sculpey glaze for this express purpose, but after going over one of the claws, it became readily apparent that the paint was cracking, peeling, and bubbling.  So...that idea was definitely out.  The solution?  Clear nail polish.  No cracking or bubbling, and it's cheaper than proper glaze anyway.  Extreme laziness ftw.
Since this may turn into an impromptu anatomy lesson, here is a human hand for your viewing pleasure.
Now there is a reason aside from my own morbid fascination that I have included this lovely anatomical diagram.  I wanted to try and explain where I attached the claws to my own fingers, and this is the best way that I know how.  The claws that I crafted give my hands the impression of having an extra phalanx, increasing length and creepiness.  The claws are attached to my hand at the point between the middle and proximal phalanges, so that I am able to retain most of my mobility and grasping ability.  

I used a satin opera glove that I had lying around (and yes, I actually have several pairs of opera gloves lying around my apartment, thank you very much) as the base for the claw.  Then I used a hot glue gun to attach the claws to the gloves at the beginning of the middle phalanx of my hand.  Of course, this means I was wearing the gloves while gluing things to my hand.  Not quite as painful as I had anticipated, but I'm sure there are easier ways to do it that involve fewer burns. 

And I even have the mobility to use a camera (even if my claws kept photobombing my pictures)
I am also in the process of making some more proximal phalanges and possibly metacarpals to go on top of the gloves to give the appearance of entirely skeletal hands, but that will be updated later. YAY CLAWS.  Time to go freak out the neighbors.

Next up- the perils of sewing pleather. 

~Kathryn

Sabtu, 28 April 2012

Airi (Meru Puri): Costume Breakdown

Another long while since I posted! Life stuff getting in the way, but hopefully soon I'll get the chance to start working on stuff for Otakon! For right now I'll break down two of my more recent costumes, Airi from Meru Puri.

Airi (Meru Puri)
005

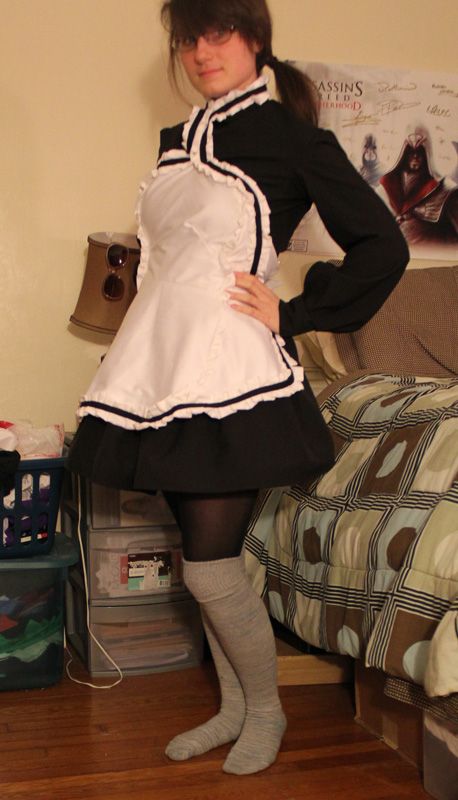
Airi was a bit tough to start off with. Not because of the dress but the apron. She has one of the most unusual aprons I've seen in a while. I really had to decide how I wanted to break it down, since it didn't seem normally possible. She didn't have the normal straps like most do...they seemed to wrap around her neck and then just sort of hold there.

I ended up breaking it down into two main parts. The dress and the apron. The dress was very simple. Just something high collared and long sleeved. It was probably the easiest part of sewing the whole thing. I think my favorite part ended up being the sleeves and how the shape turned out for them! The base of the dress, like most of these types of dresses I've had to make is based off of this pattern. I like that pattern because the skirt is really full and perfect for putting something like a peticoat under it.
 Photobucket 

The apron was the most interesting to tackle. Originally I tried to make it all in one piece like they had in the image, but I had to made an adjustment which created the seam in the middle. I created the pattern myself, and broke it into three parts. The middle and then the two sides that extend towards the back. I used snaps to hold the apron together in the back, over top of that I had a bow pinned there, to make it seem as though the apron was tied in the back. The parts around the neck were all held together by snaps, and wrapped around my neck. So when I had to put the apron on I had to stick my head through what wrapped around my neck and then snap it in the back. So the snaps held it together on my body! It stayed really nicely. 

Photobucket 

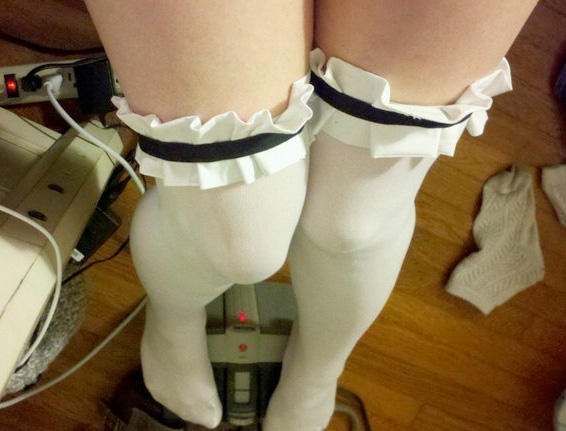
The ruffles were all done by hand. I keep saying someday I'll invest in a ruffle foot and I have yet to do so! But I created the ruffle all around the apron and the stockings. The middle black part is just bias tape sewn to the center of the ruffle. For the stockings the ruffle on them was added later. I created the ruffle and sewed it onto the stocking while I was wearing it. It just needed a few little stitches to attach it to the material and stay on.

Photobucket 

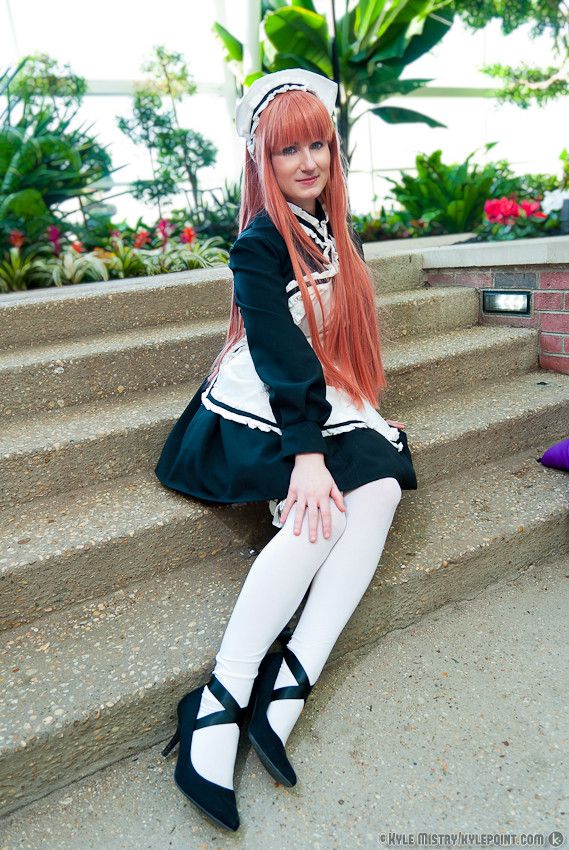
And last but not least was the headband. it was a fairly easy mod from a pre-exsisting headband. I added the ruffle and then glued the white cloth on top. The other little touch is the ribbon on the shoes. I was using a pair of shoes that I tend to use in nicer occasions and I didn't want to modify too much. So instead of attaching the ribbon to the shoe, I instead attached it to the stocking. I wrapped it around my foot and tied it around the back. To get it to stay I just created a small, easily cut away, stitch that I could remove at the end of the day. That way I didn't ruin my shoes or stockings!

And then the final product...

Photobucket

Senin, 23 April 2012

Usamimi Headbands!

  I have been so lazy lately (well, actually busy planning our trip to Orlando right after AZ), I apologize for the lack of updates on our blog.  Q_Q  Anyhow, I always had the desire to obtain a Usamimi headband since when I saw it on the old Asia Jam couple years ago.
  Usamimi, or rabbit ears, is basically the shape these headbands make on your head.  The pictures below shows some beautiful girls sporting them.
I think this is Kumikki lol but don't count my words on it.

Xiaxue - one of my fav. blogger.
and finally Masuwaka Tsubasa!
(I know...they all kinda look like the same person Q_Q it's not like I can change Asian's perception of beauty, don't judge!)
  Cute or not is up to you, but I do think this trend is cute and therefore wanted to obtain one or two of these headbands.  Now, in order to tie this in with our blog, I did find an anime example (lol).
I think she is from Lucky Star
also, if you are familiar with Lolita fashion, then you probably knew that BTSSB has also sold some of these usamimis.

Now, not only were these headbands hard to find on the internet, they were also super expensive.  How much do you think it's worth?  I think ummmmmmmm....maybe $5 - $10.  Since it's not very hard to make, I decided to try making one or two.  I found a couple of tutorials by googling "DIY Usamimi".  Some people have written extensive tutorials for these, so I won't repeat it.

Basically, I just bought some fabric from my local fabric store (1/4 yard), sew it together, put some wire in it, and Voila!  Super simple and fast if you have a sewing machine.  If not, just sew by hand.
I just folded this fabric in half and stitched both sides

This one was one of the quilting squares they sell at fabric stores.  I cut it in half and connected them to make a long strip.

The wire in the middle were taped so that it doesn't poke you later.

sewing

making the pointy "ear" part

final product modeled by Honekoneko (with Stuart in the back)

Me wearing it >.<

Me wearing #2 XD
Hope you guys liked it!!!  It takes about 20min to make each one!  :D

Mimi

Sabtu, 21 April 2012

Mirai Nikki

Lo empecé a ver hace varios meses atrás y al inicio no me llamaba para nada la atención, es más, la comparaba con Guilty Crown, comparaba Yukki con Shu, Shu un héroe y Yukki un baboso gusano XD

A veces veía por compromiso, para no dejar nada a medias, sí, de verdad no me gustaba Mirai Nikki hasta que me enganchó!


Se trata de 12 participantes que tienen un diario en su celular (si los posts del futuro aparecieran en el twitter yo también quiero tener uno de esos diarios XD! en fin) y se matan unos a otros para sobrevivir y llegar a ser Dios. Es gore pero no me dio miedo, es más, adoré a Yuno que es toda una yandere loca <3 O porque las pelirosas rulz?

Y es así que terminé obsesionada con Yuno y haré cosplay de ella...Hasta averigué un hacha, es de Marli y me lo va a prestar mwhahaha!


Mis favoritas y favorito son la 9na, 6ta (aunque su historia fue demasiado traumatizante) y el 12vo que me parece divertido.


Jumat, 20 April 2012

Preestreno Sevilla 2º temporada JDT

Ya lo hicimos en Madrid y salisteis muy contentos, pues ahora le toca el turno a SEVILLA!! La librería Beta hará un especial de 12 minutos de la segunda entrega de JDT, la entrada es totalmente gratuita hasta completar aforo, así que, si de verdad te gusta Juego de Tronos y eres un verdadero fan debes ir si o si! 

Además si vas disfrazado de la época, que no de JDT, si no de la época, podrás optar al sorteo de un juego de libros! 

Y como en LVEC te ayudamos lo máximo posible, te vamos a ayudar con un cosplay hiper rápido de la época, cómo? muy fácil, puedes coger un vestido viejo que tengas en casa, comprar un par de flores, pegarlas en el cuello del vestido y ceñirte el vestido un poco al cuerpo, con un trozo de tela, ponértelo en la cabeza o coserlo a la falda del vestido.. es cuestión de imaginar!! los chicos lo tenéis mas fácil, con un chaleco viejo, le quitáis las mangas, os ponéis debajo un chaleco de mangas cortas y de pantalón, uno simple y con botas altas y listo!


En serio te lo piensas perder?! Para mas inri, nosotros estaremos allí con cámara en mano y obviamente los mejores cosplays saldrán en LVEC!!


SÁBADO 21/04/2012 - 12.00H - ENTRADA LIBRE (HASTA COMPLETAR AFORO)
LIBRERÍA BETA IMPERIAL - C/SIERPES 25
El preestreno en Sevilla de la 2ª temporada de la serie Juego de Tronos tendrá lugar este sábado día 21 a las 12.00h en la librería Beta Imperial que se encuentra en la calle Sierpes 25 de Sevilla, en un acto organizado por las Librerías Beta y Canal +, y que cuenta también con la colaboración de la editorial Gigamesh.
Esta segunda temporada se estrenará, oficialmente, el próximo lunes día 23, a las diez de la noche en exclusiva en Canal +.
Entre todas aquellas personas que acudan vestidas de la época en la que se ambienta la saga (medievo-fantasía) a la librería Beta, sita en la calle Sierpes número 25 de Sevilla, se sorteará un juego de libros de “Canción de hielo y fuego”, y se repartirán posters de la saga hasta fin de existencias.
El evento comenzará a las doce del mediodía, con las intervenciones de un experto en la serie Juego de Tronos, proveniente de Canal +, y de Xavier Marcé, especialista en novela épica y autor.
A continuación se proyectará un especial de 12 minutos sobre la producción de esta segunda temporada, paso previo a la proyección en preestreno del primer capítulo, “El Norte no olvida”.
Finalmente se sorteará el juego de libros entre todos aquellos que hayan acudido vestidos de la época

Recordad, no os lo perdáis!!

Info: AQUI

Rabu, 18 April 2012

Insane Black Rock Shooter progress: part 3 - The Insane Blade Claw

  Now that the anime for BRS has finally come to an end (right?), my character is not just Huke's illustrations anymore!  Huzzah!!! I probably have not indicated this before, but I'm actually doing my costume based off of the figure that comes with the BRS blue-ray disc.

  Anyhow, I have finally made some very small progress with my weapons!  The big one (Insane Cannon Lance) is still the biggest concern for me, but I wanted to at least get started on the smaller one due to it's complexity.  The sword itself is called the Insane Blade Claw (why are the names for things in BRS so stupid sounding?), it is basically an upgrade from the Black Blade used by BRS.

  My inspiration for making this weapon comes from Kamui Cosplay, who is known for her awesome weapons and armors made out of foam or/and wonderflex.  I decided to use expandable foam for this sword because of it's "organic" shape.  So, below is my current progress:
1. I got some foam boards (the ones you use for science projects) from the scrap exchange for about 25 cents each (if not less), and free handed the sword onto the board.  I kind of trust my free hand ability (even though I know it's not perfect), but if you don't (or you are a perfectionist), then do it with a projector, or print out large patterns in pieces and then glue them together.  Then I cut the sword out with an X-acto knife.

2. Here is where I made my first large mistake.  I forgot about the stick that I have to insert into the middle of the sword.... yeah, but you will see I fixed that later.  Anyways, I sprayed "Great Stuff" foam (from Home Depot for $3.99) onto my foam board pattern.  This was rather amusing because the foam came out like whipped cream.  Although on the can it said that the foam will cure in 8 hours, this is complete bull-shit.  Perhaps it's due to the thickness I sprayed, it took about 14 hours if not more for the foam to completely cure.  Also, according to the guy that works at Home Depot, air is what cures the foam, so if you spray this stuff into a bag that is not airy, the foam will become liquid.


3. After about two or three hours (I went to dance and came back), the top part of the foam was already stiff, so I just turned the whole thing over.  Of course, this is when I realized, "SHIT, I forgot to stick a handle in there."  Luckily, I only had one side sprayed.  I took a sharp utility knife and dug a long hole onto the exposed foam board, this is when I realized that nothing inside was dry, and once you get that stuff on your hand, it is very hard to get off.  I sprayed some more foam into the middle of the sword, and placed a pvc pipe (from Stuart's Stein cosplay) into the middle of the sword (of course, the pipe had to be supported with a box or something).  Then, I sprayed foam onto the other side.  "PHEW"


4. Once the foam was completely cured (aka Next Day).  I took out my utility knife and just carved the sword out.  This sounds easy, but it was rather difficult.  Just be patient and take your time.  Do it at a place that you don't mind getting dirty, and don't wear anything that the foam will stick to (such as nylon stockings Q___Q).  When you are happy with what you have, you should just put the knife down.  I tried several different types of knives because I didn't like how short the blade on the utility knife was.  However, nothing worked better than the utility knife.  Saws are nice and long, but they created very uneven surfaces and sent tons of little foam particles flying everywhere.  I had a set of wood carving tools that I wanted to use for the details, but it didn't work really well.

That's all for now, I'm planning on masking tape the whole thing, then paper mache it with newspaper.  I'm still debating on whether to do the pulp paper mache on top of it or not, I like the idea of paperclay better, but of course it is a lot more costly >.<.

- Mimi

Selasa, 17 April 2012

Sakura Matsuri 2012 - Washington DC

This weekend, in Washington DC, was the 52nd annual Sakura Matsuri, or Cherry Blossom Festival. The festival celebrates the 1912 gift of cherry blossom trees from the mayor of Tokyo to the United States, as continued celebration of friendship between the two countries (Thanks Wikipedia! :P). We at Cosplay-vania decided to take a day trip to DC to see what the Sakura Matsuri was all about.

(Stuart) After a very bumpy and wobbly ride on a double-decker bus, granting us very little sleep, we arrived in DC around 6:00 AM. One round of much needed coffee later, we were ready to hit the streets. First up in the list of events was the National Cherry Blossom Festival Parade. We got some pretty awesome seats on the side of Constitution Ave. to watch all of the floats and performers go by. Giant Scooby-Doo, Ms. Piggy, and Cherry Blossom Balloons, various groups of clowns, policeman, marching bands, and motorists, some sweet vintage cars, and plenty of pageant winners all got there applause from us. I enjoyed seeing the Bon Odori dancers and the Japanese drummers pass by (the toddlers playing the drums were really cute, hehehe). We also saw our first signs of cosplayers in the distance (the pink and purple wigs in the crowd gave them away :P).
We were SUPER Close to Katie Couric and Alex Trebek, the hosts of the parade. Then they walked away, lol.

Very pretty fluffy dresses and parasols :)

D20 dice XD

AWESOME Spider-walker machine from the Science and Engineering Festival representatives.


Clown-organ car for the WIN

This guys was a pro clown-cyclist!

Power Rangers made an appearance too! Though these were from the Ninja season that I didn't really recognize, lol.


The Festival:

Insert Kathryn narration here! After the parade was mostly finished (and our behinds were completely numb from sitting on the sidewalk for two and a half hours), we meandered a few blocks over to the actual festival area. Come 11:30 AM it wasn't terribly crowded, and it was pretty easy to get into the area they had cordoned off for the festival. We were also absolutely starving, as our McDonald's wake-up meal seemed like it had been an eternity before, so we headed over to the food stalls to peruse the wares.

Stuart and I tried the Yakisoba, which was alright, but rather light on the flavoring. Mimi had Takoyaki, more or less fried balls of octopus, which she enjoyed. All in all, not bad for stall food at a festival, but as the day progressed the lines got impossibly long and the food progressively less edible as the crowds grew in size.

There was a decidedly larger smattering of cosplayers in the festival area proper, but still not to a large degree. For the most part we just wandered from stall to stall browsing merchandise.

Totoro! And someone's awkward reflection.

There was even a station where you could try your hand at throwing shurikens at a target- Stuart tried his luck, but to no avail...


We also saw a group of people in Anigao (see Mimi's post), and I have to agree with her - it is insanely creepy looking. I have an aversion to Uncanny Valley and doll-like things anyway, but damn are those masks creepy.


InuYasha is freaking me out, man...

We wandered over to the J-pop stage and heard The Asterplace play - they did some covers of anime songs, which was pretty cool.

The drummer was hilarious

The last thing we stayed for was the Anime USA Cosplay Fashion Show (because honestly, by that point we were falling asleep on our feet).

And here is the point where I'm going to mini-rage, because in my mind, cosplay refers to dressing up as a specific character from anime, video game, comic books, or some other media. The minute they started including Japanese street fashions in the lineup, it rather soured the taste of the entire fashion show for me. I have nothing against people dressing up in Decora, Cyberpunk, Lolita, or what have you. Just don't call it cosplay, and certainly don't put it in a show dedicated to cosplay. There is a difference between Japanese street fashion and cosplay, and the fact that these were included in the line-up really got on my nerves.


Decora is fashion, NOT COSPLAY.

That's not to say that they weren't lovely outfits that were perfectly representative of the fashion, because they were. Just not of cosplay.

And now, in the interest of time, I am going to photo dump sans captions. Watch out, people. Here be pictures.


And at that point we had been on our feet for most of the day, so we left the Sakura Matsuri area and hobbled over to the Smithsonian Museum of Natural History!

Smithsonian Museum of Natural History:

(In Mimi's voice) If you have been there, then you know it is probably one of the coolest museums in the whole entire DC area (lol). It usually takes me a while to get through museums, but this time we only took about umm...2 hours. We visited almost every part of the museum except for a couple that we were not interested in. We even attempted the insects exhibition despite my phobia for c**********s.

Kathryn freaking out about bones because she loves them so much!!!!

A ghostly picture of me trying to touch the whale replica!!! I really like how creepy this picture turned out.

Stuey not really getting attacked by a stuffed tiger.

Many silly pictures later, we were so tired that we had to leave the museum and hunt for food. We ate at "Absolute Thai" (I think) and it was absolutely delicious! NOM NOM


Twitter Delicious Facebook Digg Stumbleupon Favorites More

 
(˘̀^˘́҂)ҧ Design by uncensored8 | By Maling Durjana DMCA_logo-200w Pelacur Gratis Fast loading | Sexy Analytic (˘̀^˘́҂)ҧ